

Network Settings
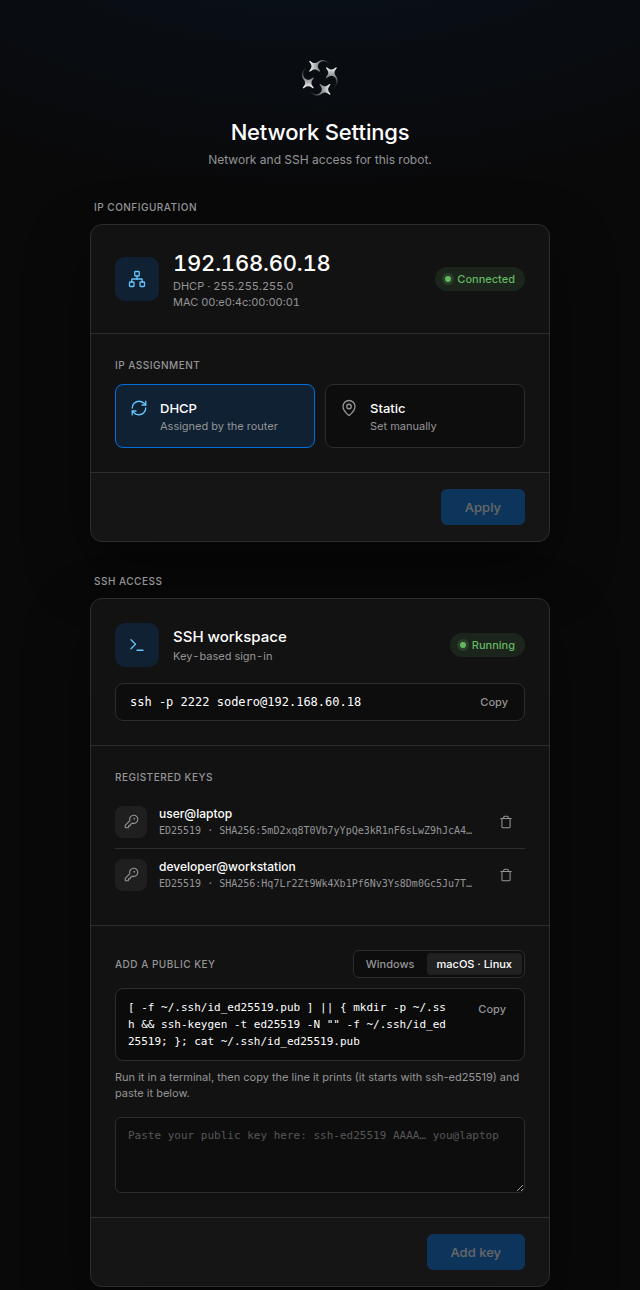
Stellar X serves a small settings page on port 3000. Use it for the two things you need before anything else:
- the IP address of the controller's LAN port Eth1, and
- SSH access to the controller's SSH workspace.
Open the page from any computer on the same network:
In this guide the controller's address is 192.168.60.18, an example address on a lab network, so the page is http://192.168.60.18:3000. Replace it with your controller's address.
Initial address: static 10.0.0.1. Eth1 starts with the static address 10.0.0.1 (subnet mask 255.255.255.0). To reach it the first time, connect your PC with a cable and give the PC a static address in the same subnet, such as 10.0.0.2 (Stellar X). Then open http://10.0.0.1:3000 and change the address under IP Configuration.
The page needs no sign-in: anyone on the same network can change the address and register SSH keys. Connect Stellar X only to networks you trust.
Stellar Station itself is served on the standard web port: http://ROBOT_ADDRESS (port 80). Port 3000 is only for these settings.
1. IP Configuration
The IP CONFIGURATION card shows and changes the address of Eth1. The page shows no port name; every value on the card belongs to Eth1.
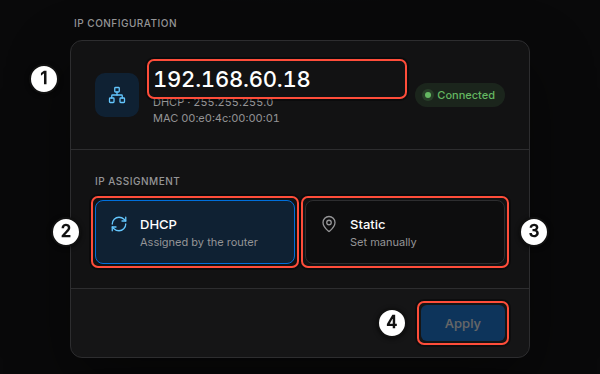
| No. | Item | Description |
|---|---|---|
| 1 | Current address | The address Eth1 has now, how it got it (DHCP or Static), the subnet mask and the port's MAC address. Connected means a cable is plugged in and the link is up. |
| 2 | DHCP | The router assigns the address. This is the simplest setup on an office or lab network. |
| 3 | Static | You enter the address yourself. Use it for a direct cable between your PC and the controller, or on a network without a DHCP server. |
| 4 | Apply | Applies the selection. Nothing changes until you click it. |
Set a Static Address
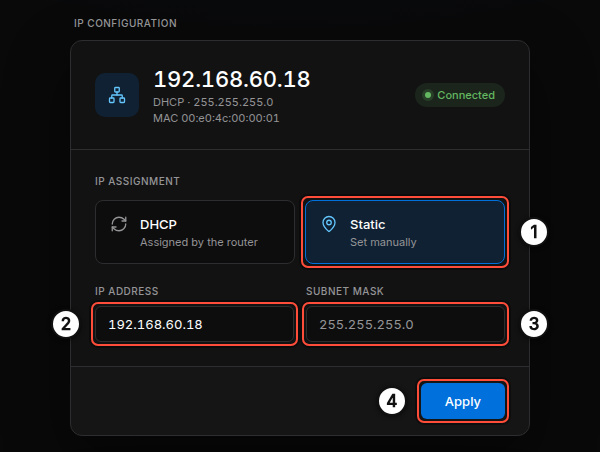
- Click Static ①. The card shows IP ADDRESS and SUBNET MASK.
- Enter the new address in IP ADDRESS ②. The subnet mask ③ is fixed to
255.255.255.0. - Click Apply ④.
After Apply, the controller moves to the new address and the page stops answering at the old one. Open http://NEW_ADDRESS:3000 to continue.
Your PC must be on the same subnet to reach the new address. For example, after setting 10.0.0.1 on a direct cable, give your PC a static address such as 10.0.0.2 with mask 255.255.255.0.
Automatic rollback. If the new setting cannot be applied, or no address comes up (for example DHCP is selected but no DHCP server answers), the controller restores its previous settings by itself and the page reports what happened.
Notes
- The page changes Eth1 only. Eth2 keeps using DHCP. The EtherCAT port is reserved for EtherCAT devices; it never gets an IP address and is not shown here (Stellar X › Device Overview).
- No default gateway is configured. Stellar X works on the local network and does not need Internet access.
- With DHCP, find the controller's address in your router's client list; its host name is
stellar-x.
2. SSH Access
The SSH ACCESS card controls who can sign in to the controller's SSH workspace. The workspace accepts SSH keys only; there is no password sign-in.
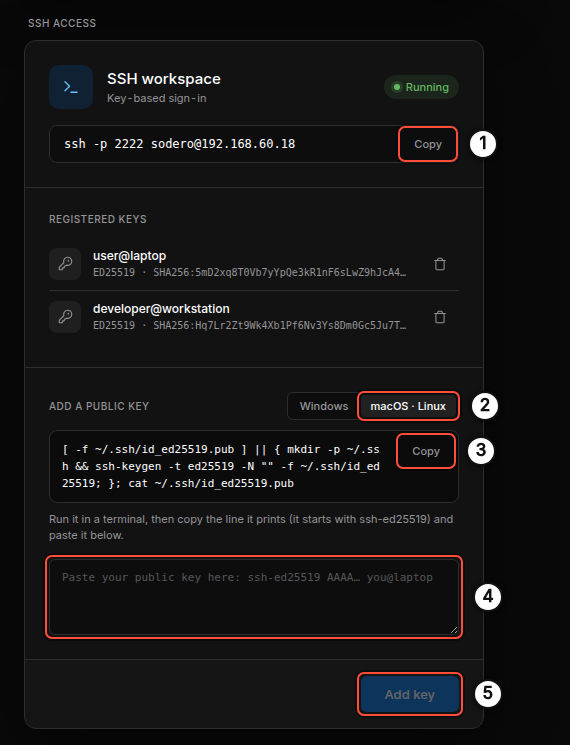
| No. | Item | Description |
|---|---|---|
| 1 | Connection command | The exact command to connect, with Copy. Running means the workspace is up. |
| 2 | Operating system | Shows the key command for Windows (PowerShell) or macOS · Linux. |
| 3 | Key command | Creates a key on your computer if it has none, then prints its public key. |
| 4 | Public key box | Paste the printed line here. It starts with ssh-ed25519. |
| 5 | Add key | Registers the key. It appears under REGISTERED KEYS. |
Register a Computer
-
Select your operating system ②, click Copy ③ and run the command in a terminal on your computer.
if (!(Test-Path $HOME\.ssh\id_ed25519.pub)) { mkdir $HOME\.ssh -Force | Out-Null; ssh-keygen -t ed25519 -f $HOME\.ssh\id_ed25519 }; Get-Content $HOME\.ssh\id_ed25519.pub | Set-Clipboard; Get-Content $HOME\.ssh\id_ed25519.pubOn Windows the command also copies the key to the clipboard. When
ssh-keygenasks for a passphrase, press Enter twice to create the key without one. -
Paste the printed line into the box ④ and click Add key ⑤.
-
Click Copy next to the connection command ① and run it:
To revoke access, click the trash icon next to a key under REGISTERED KEYS. The computer can no longer sign in; files in the workspace are kept.
Paste only the public key (the .pub file). The page refuses private keys and keys with options.
Each person or computer should have its own key. The key's comment (for example user@laptop) is shown in the list, so you can tell the keys apart.
Continue with SSH Workspace to learn what you can do once you are connected.