

Strider
Stellar Strider controls wheeled mobile bases. A Strider node (sodero.mlc.NAME) turns body velocities into wheel commands for its gateway, integrates odometry, and enforces the speed and acceleration limits of its .sddm document. The Strider web UI lets you jog the base, watch its state and odometry, and send navigation goals.
Supported drive types (templates of the .sddm document): differential drive, skid steer 4WD, mecanum 4WD, swerve 4WD and Ackermann.
1. Open Strider
On the Station, start the gateway first, then the Strider node (Running Nodes). Click Strider in the node's CONTROL section, or the Strider link on the node card. Strider opens in a new tab for that robot.
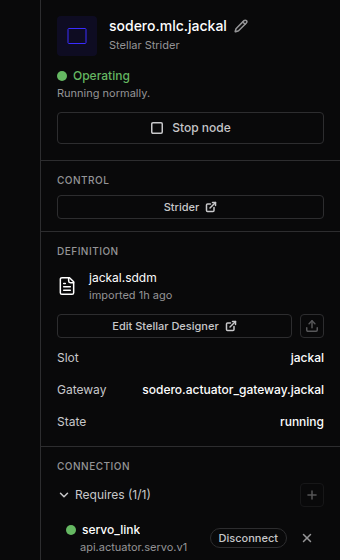
Each Strider tab controls one robot. With several mobile robots, open one tab per robot from its own node. The Strider link on a Navigator node opens Strider directly on its Navigation page.
2. Screen Layout
The left rail has three pages: Status, Drive and Navigation. The top bar shows the readiness pill, System Log, Motion Alarm, E-STOP and the units on every page, plus the actions of the current page: Jog on Status, Stop Motion on Drive, Set Goal and Start Navigation on Navigation.
| Item | Description |
|---|---|
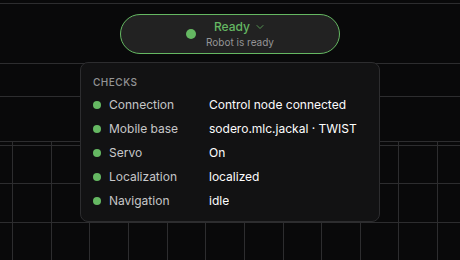
| Readiness pill | The current state in one line, for example Manual Drive Ready or Servo Off. Click it for the CHECKS list: Connection, Mobile base, Servo, Localization, Navigation. |
| System Log | Events of this browser session, with filters for System, Drive, Navigation and Localization |
| Motion Alarm | Active alarms and recent errors |
| Stop Motion (Drive page) | Stops manual driving and cancels a running goal |
| E-STOP | Software stop of the base: cancels driving and the navigation goal and sets the wheel speeds to zero at once, with the servo still on. It latches until Clear E-Stop, which switches the base to Idle. It does not replace the hardware emergency stop (Stop Controls). |
| Units | m / m/s / deg or m / m/s / rad. Display only; commands are always SI. |
3. Status Page
| Card | Contents |
|---|---|
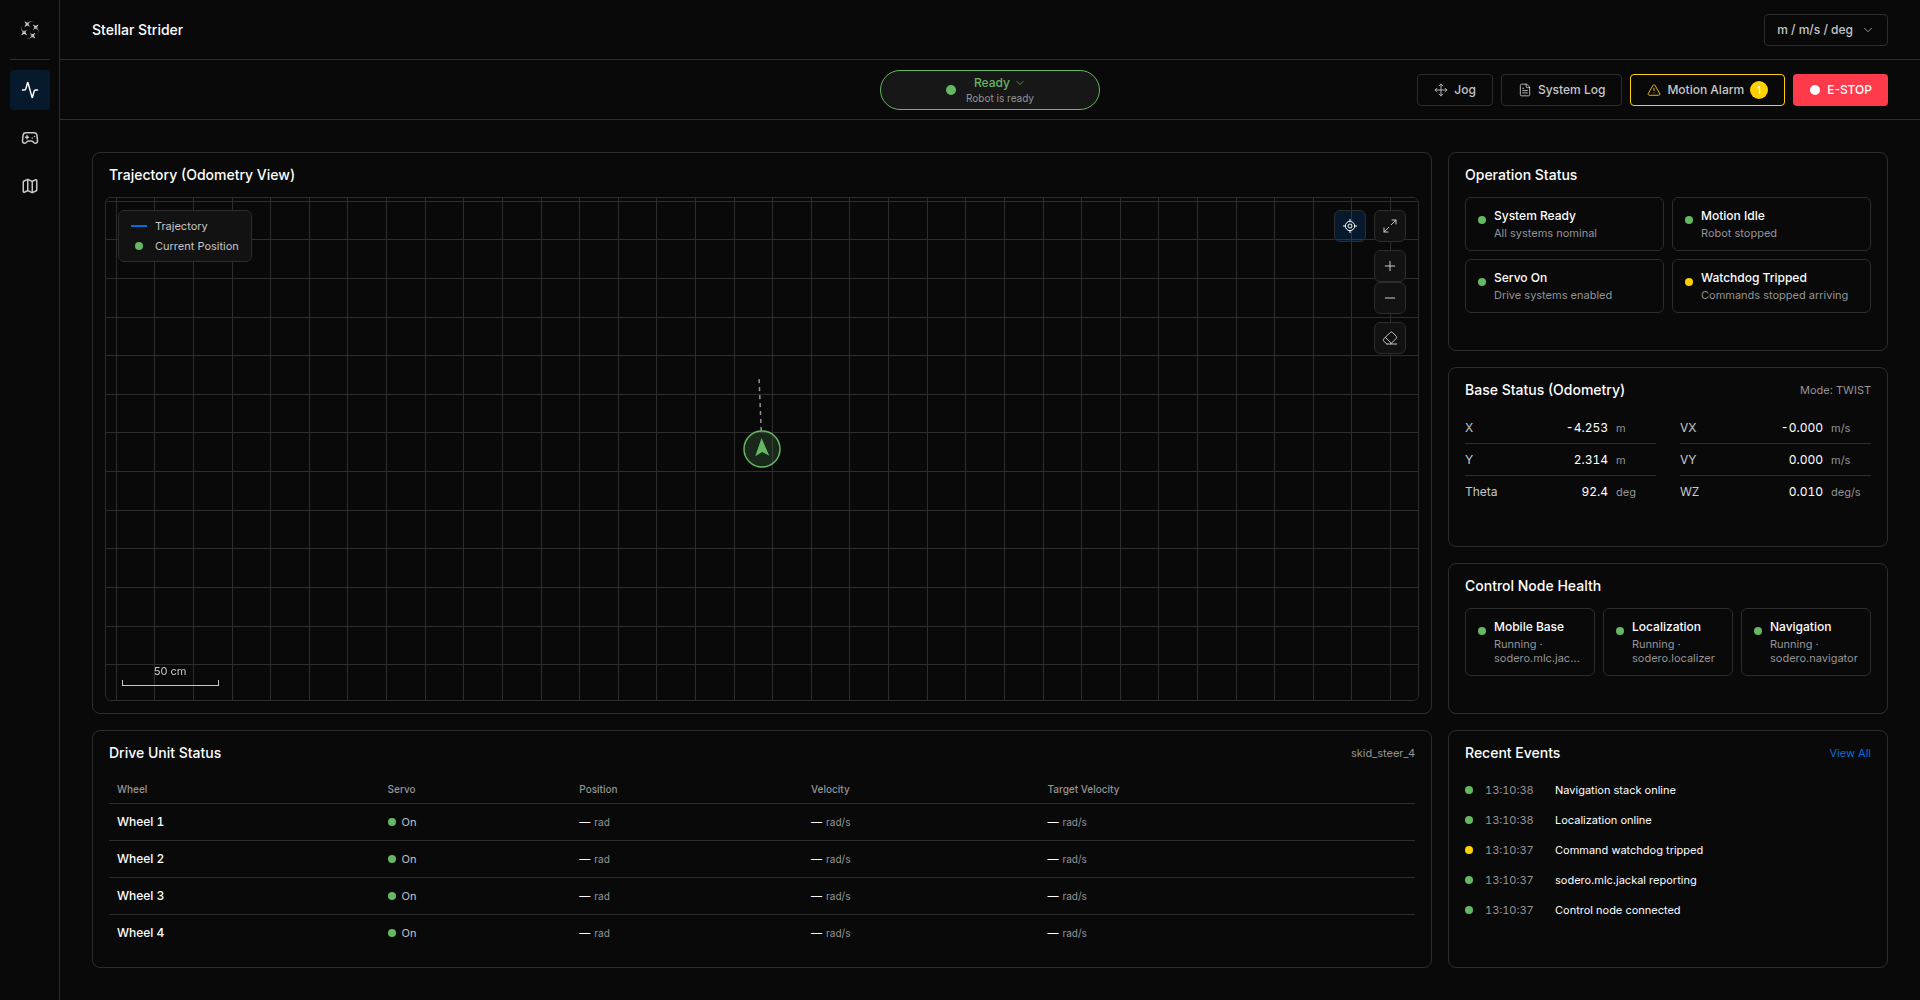
| Trajectory (Odometry View) | The path driven since the last mode change, in the odometry frame. Buttons recenter, zoom, go full screen and clear the trail. |
| Operation Status | System Ready, Moving / Motion Idle, Servo On / Off, Fault Clear / Emergency Stop / Fault / Watchdog Tripped |
| Base Status (Odometry) | Mode and X, Y, Theta, VX, VY, WZ |
| Control Node Health | Whether the base, the localizer and the navigator are reachable |
| Drive Unit Status | The drive template (for example skid_steer_4) and, per wheel, the servo state, position, velocity and target velocity |
| Recent Events | The six latest events; View All opens the System Log |
Watchdog Tripped while the base stands still in Twist mode is normal: it means that no velocity command is arriving, so the base holds zero speed.
4. Jog the Base (Drive Page)
Step by Step
- Make sure the area around the robot is clear and you can reach the emergency stop.
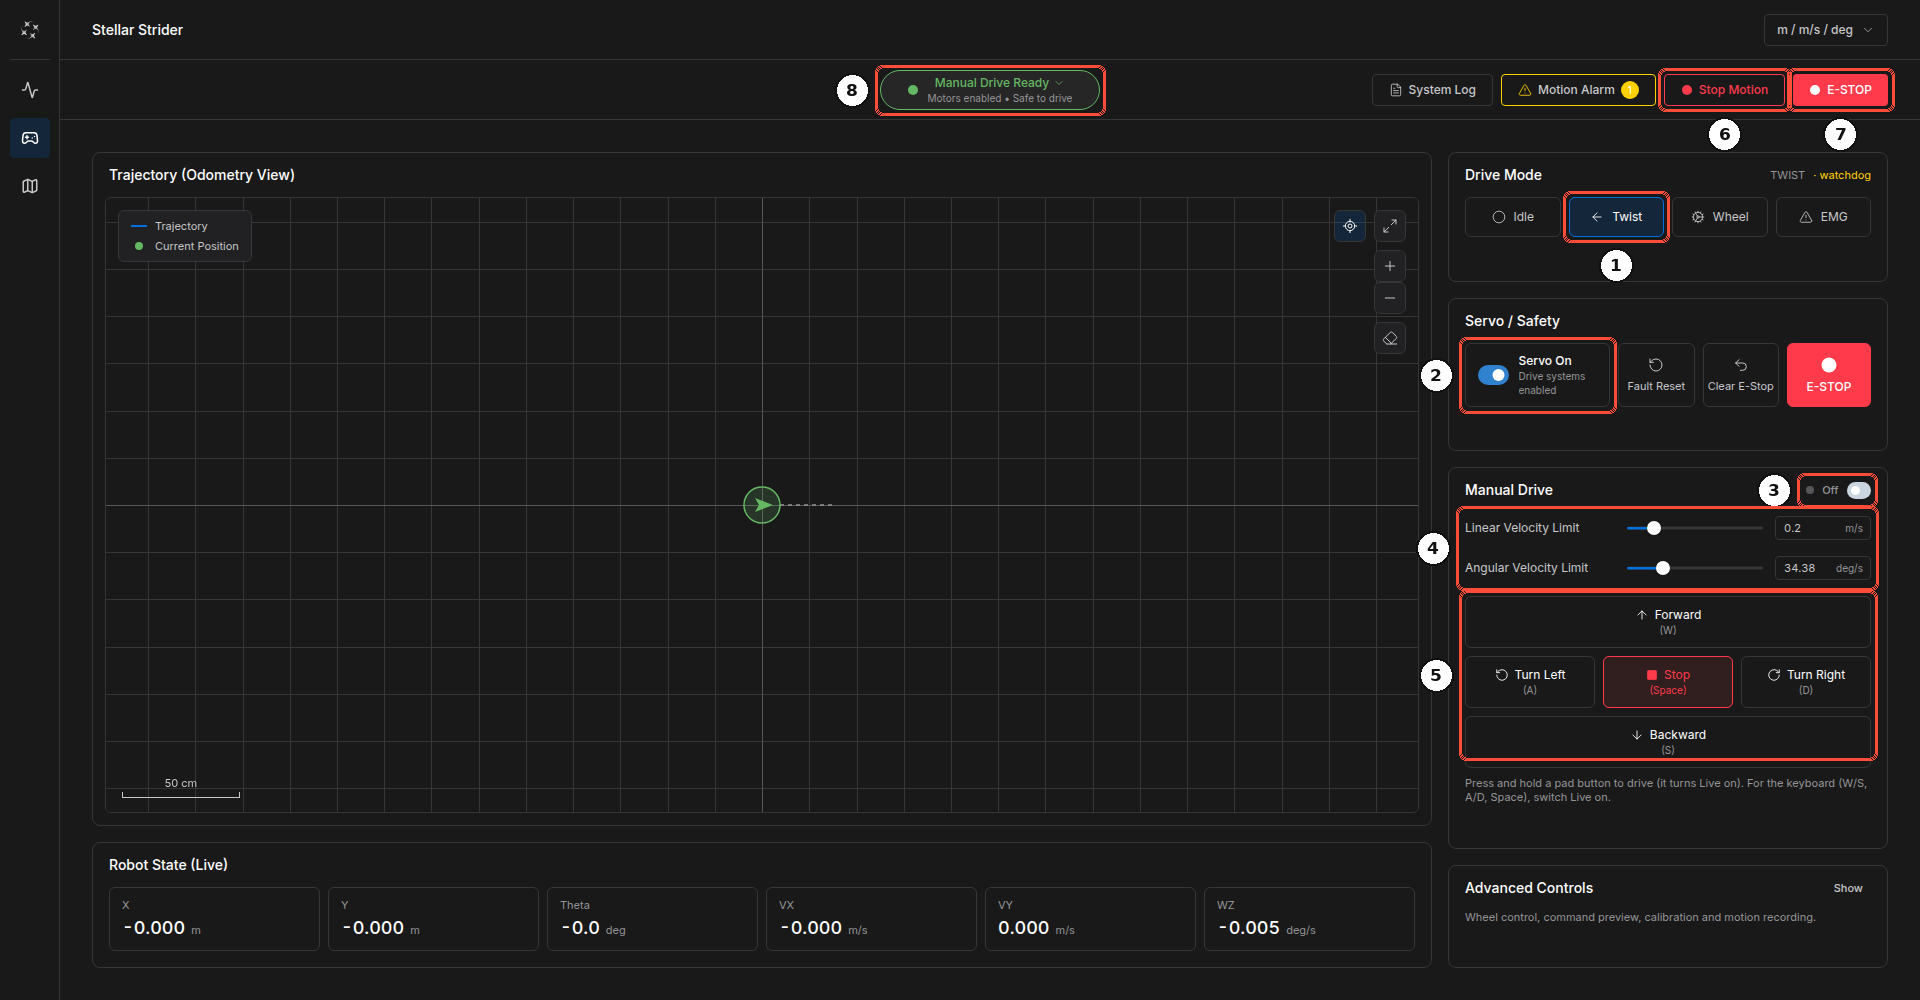
- Under Drive Mode, click Twist ①.
- Under Servo / Safety, switch Servo On ②. The readiness pill shows Manual Drive Ready.
- Set the speed limits ④: Linear Velocity Limit (default 0.2 m/s, at most 0.8 m/s) and Angular Velocity Limit.
- Press and hold a pad button ⑤: Forward (W), Backward (S), Turn Left (A), Turn Right (D). The base moves only while you hold the button and stops when you release it; Stop (Space) stops it too. The base slows down at the acceleration limits of its document.
- To drive with the keyboard, switch on Live ③ in Manual Drive, then use W, S, A, D and Space.
- When you are done, switch the servo off and click Idle.
| No. | Control | Meaning |
|---|---|---|
| 1 | Drive Mode | Idle: no motion; the wheels stop at once. Twist: body velocity commands (jogging and navigation). Wheel: direct wheel speeds (advanced). EMG: stops the base like E-STOP, but does not latch. |
| 2 | Servo On / Off | Enables or disables the drives. Fault Reset clears drive faults; afterwards switch the servo off and on again. Clear E-Stop releases a latched E-STOP. |
| 3 | Live | Sends commands at 20 Hz from the keyboard. Commands stop when the window loses focus. |
| 4 | Velocity limits | Upper limits for manual driving |
| 5 | Drive pad | Hold-to-drive buttons |
| 6 | Stop Motion | Stops manual driving and any navigation goal |
| 7 | E-STOP | Software stop that latches (Stop Controls) |
| 8 | Readiness pill | Why driving is or is not possible right now |
Manual commands take priority over navigation: jogging during a navigation goal overrides the navigator and can end the goal. Every manual command expires after about a second, so manual driving stops by itself if the connection drops. A navigation goal does not: cancel it with Stop Motion, Cancel or E-STOP.
Advanced Controls
Click Show next to Advanced Controls for:
| Section | Use |
|---|---|
| Wheel Direct | Command each wheel's speed (Wheel mode) |
| Preview Command | See which wheel speeds a body velocity would produce, without moving (safe with the servo off) |
| Steering Origin | Set the zero angle of steered wheels |
| Calibration | Differential drive: reset odometry and calibrate wheel radius and track width by driving 1 m straight and turning half a circle |
| Record / Replay | Record a manual drive for a number of seconds and replay it |
5. Navigation Page
The Navigation page appears when a Localizer and a Navigator run on the Station (Localization and Navigation).
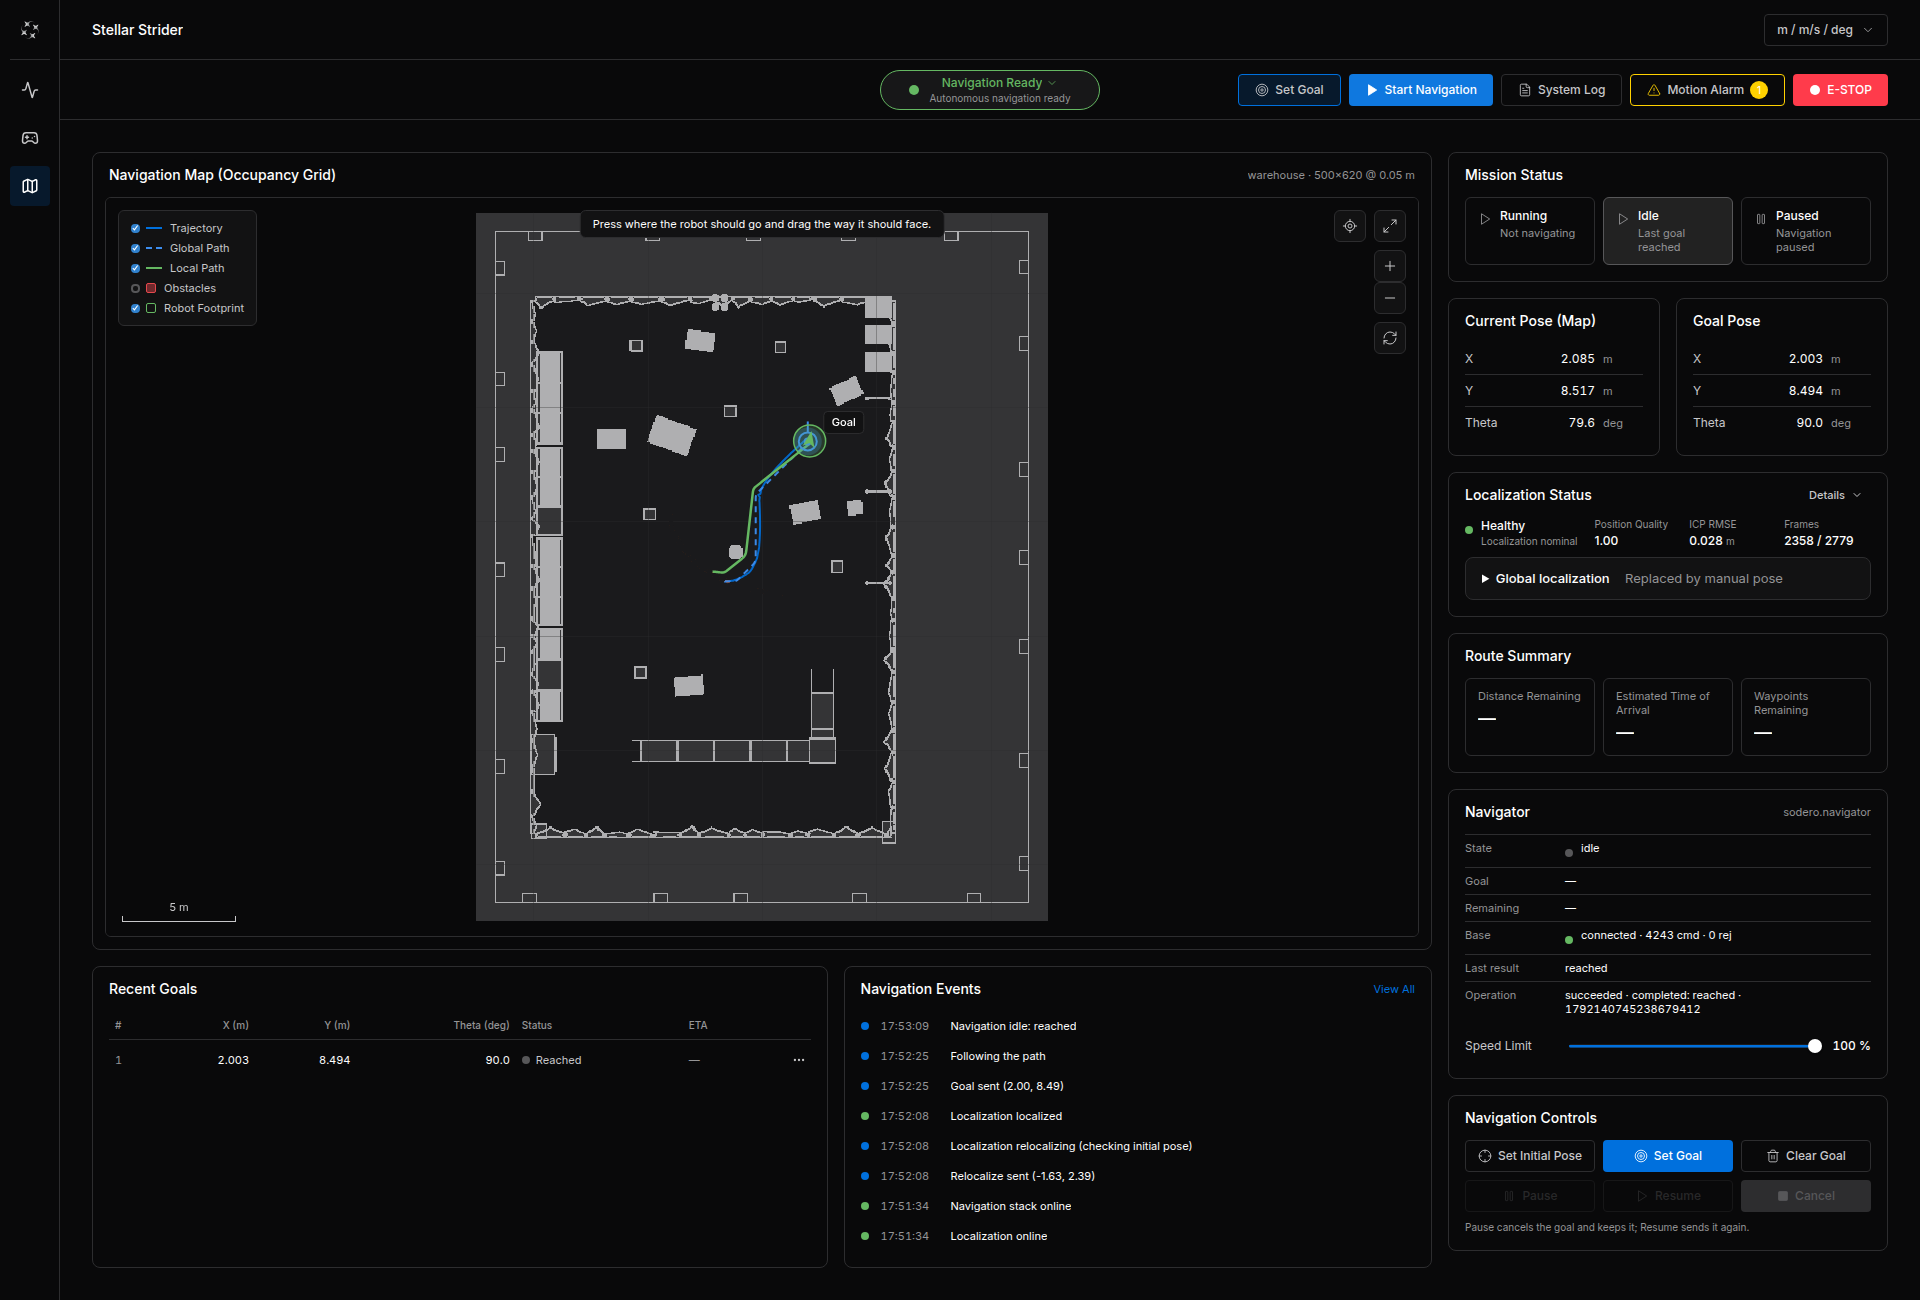
| Card | Contents |
|---|---|
| Navigation Map (Occupancy Grid) | The map of the loaded map bundle, the robot, the planned path and the goal. Layers: Trajectory, Global Path, Local Path, Obstacles, Robot Footprint. Drag to pan, scroll to zoom. |
| Mission Status | Running, Idle or Paused |
| Current Pose (Map) / Goal Pose | Where the robot is on the map and where it is going |
| Localization Status | Healthy, Degraded, Initializing, Relocalizing, Lost or Uninitialized, with position quality and ICP error. Global localization searches the whole map when the robot is lost. |
| Route Summary | Distance remaining, estimated time of arrival |
| Navigator | Navigator state, the base connection and a Speed Limit slider (10–100 %) |
| Navigation Controls | Set Initial Pose, Set Goal, Clear Goal, Pause, Resume, Cancel |
| Recent Goals / Navigation Events | Goals sent from this browser and their results; navigation events |
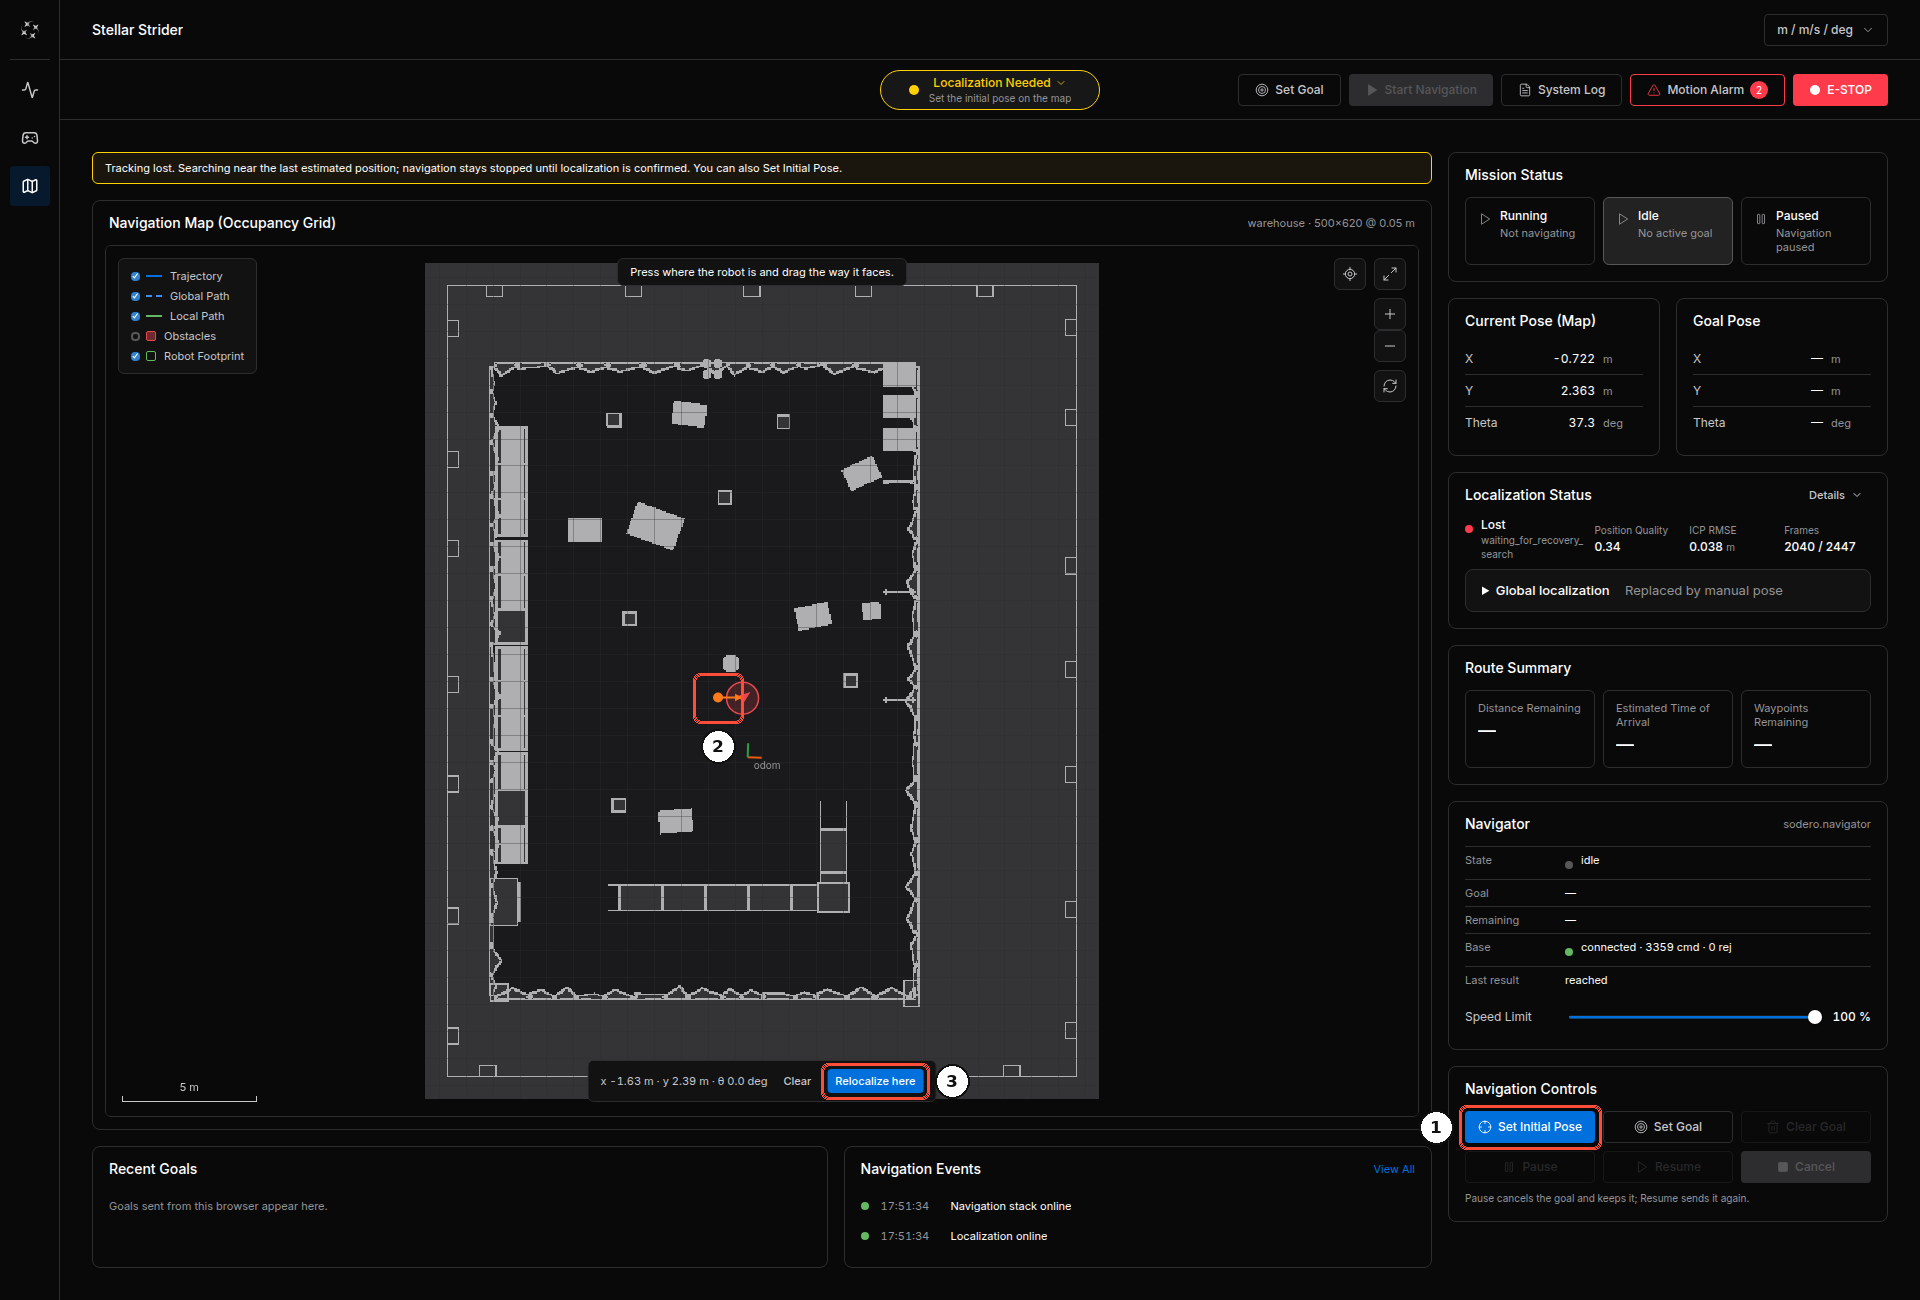
Set the Initial Pose
If the localization status is not Healthy, tell the localizer where the robot is:
- Click Set Initial Pose ①.
- Press on the map where the robot stands and drag in the direction it faces ②.
- Click Set initial pose (or Relocalize here ③ when a pose was set before).
Send a Goal
- Make sure the base is in Twist with the servo on (the readiness pill shows Navigation Ready).
- Click Set Goal, press on the map where the robot should go and drag in the direction it should face.
- Click Start Navigation. The planned path appears, and Navigator shows following.
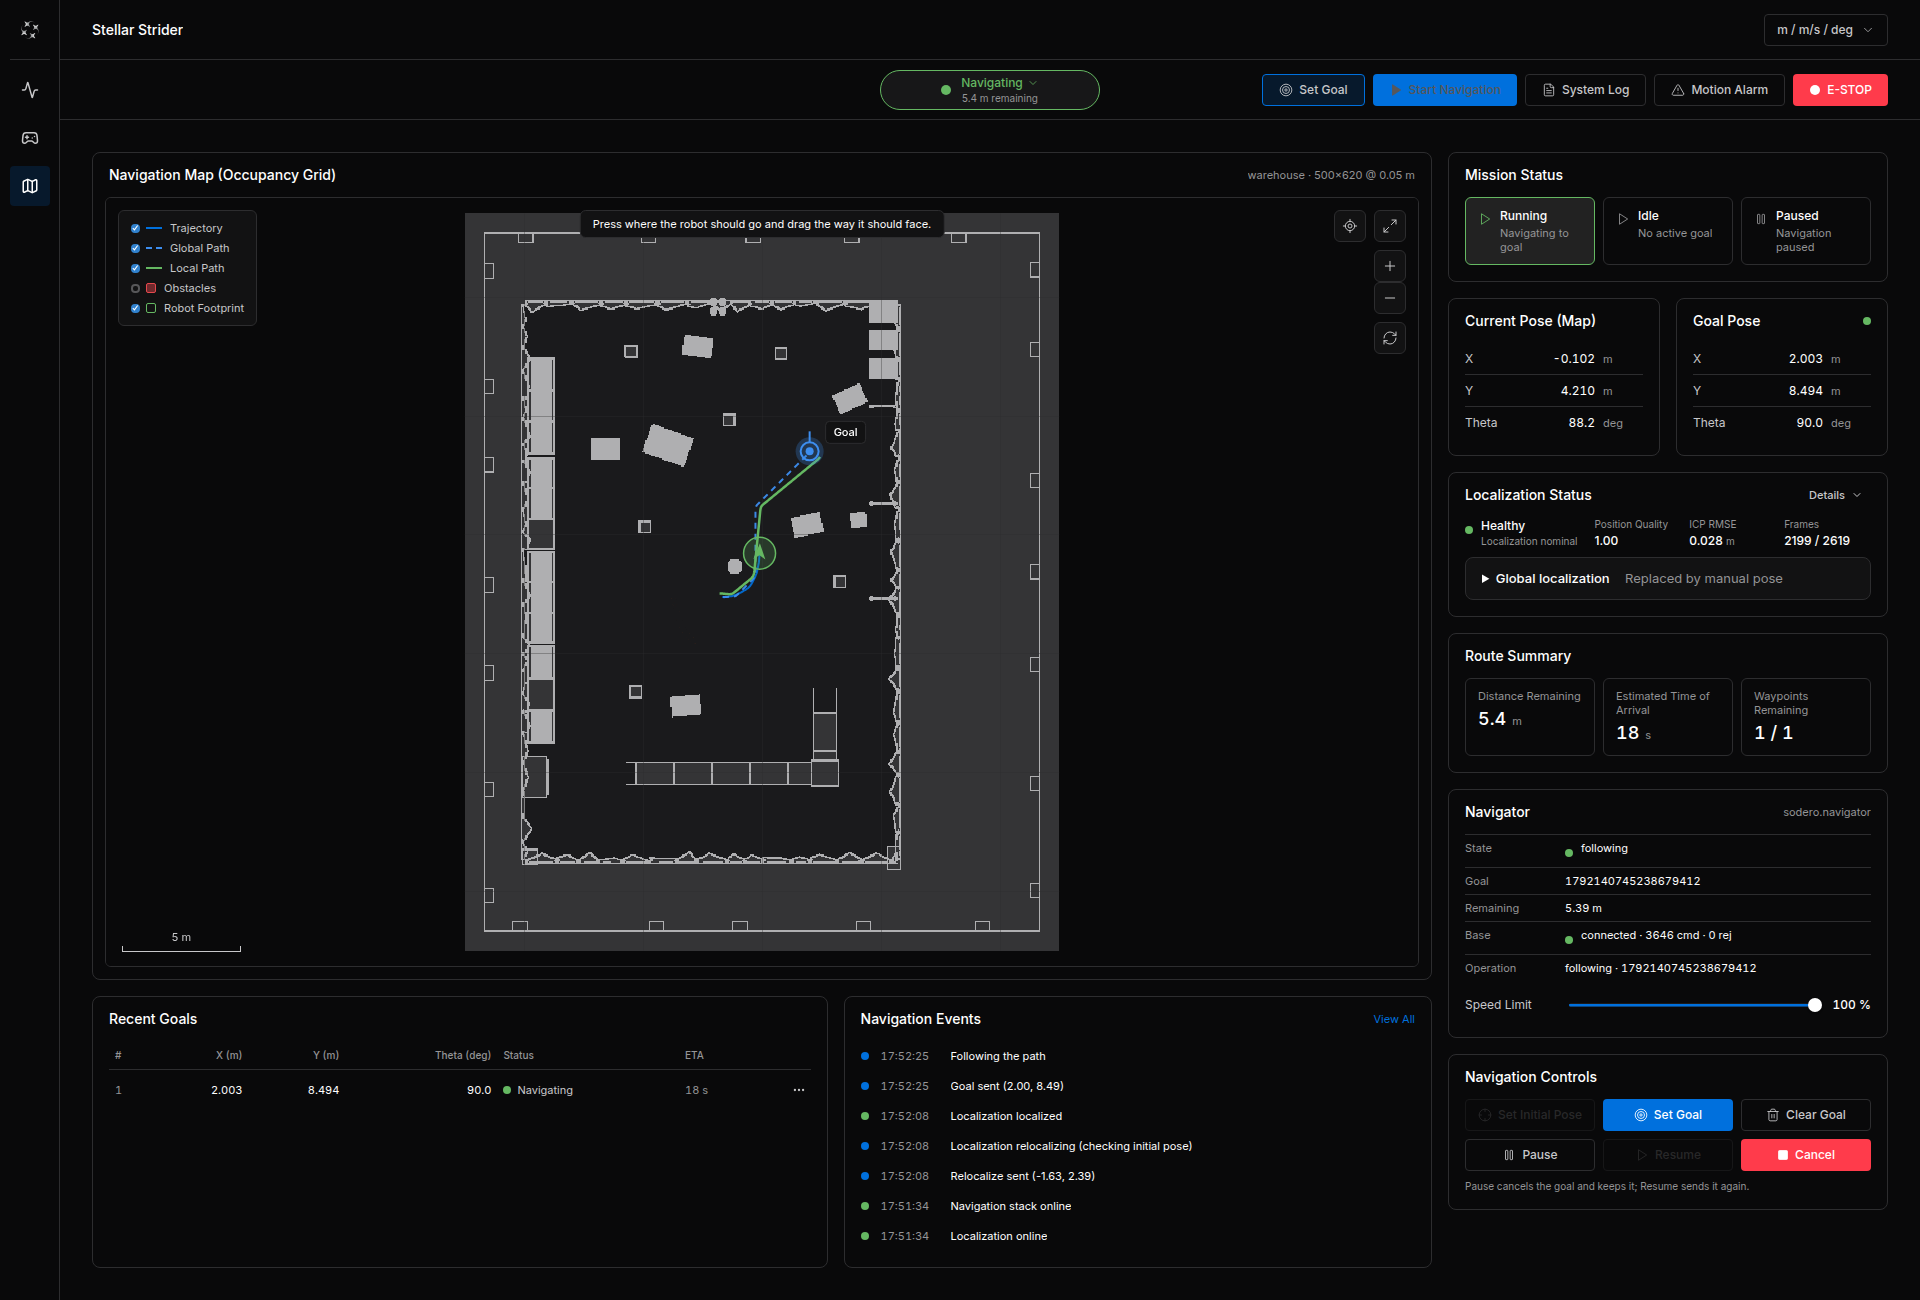
Pause cancels the goal and keeps it; Resume sends it again. Cancel stops navigation.
6. Control Strider from Programs
The main functions are also available to programs:
- From the SSH workspace with
sodero tools call strider.set_mode,strider.servo_on,strider.set_twist,strider.stopandstrider.get_state(sodero CLI). - From your own modules on the Station through the
mobile_baseinterface (Create Custom Modules).
sodero tools call strider.get_state --input '{"target": "sodero.mlc.jackal"}'
sodero tools call strider.set_mode --input '{"mode": "TWIST", "target": "sodero.mlc.jackal"}' --execute
strider.set_twist is a single velocity sample that expires after a short time. A program that drives continuously must send samples several times per second, and must stop the robot with strider.stop when it ends.